Friday, July 16, 2010

Preparing Your Tracks for Drums

Preparing Your Song
Before you can get drums added to your song, you should have as much of the arrangement and other parts recorded as possible. This ensures that when you send your tracks to MyOnlineDrummer.com for drums, the song is complete and we can listen to how to best help the song. In addition to having the arrangement set, and instruments recorded properly, it is also very useful if the song is synced to a click track. This helps when recording your drum tracks and keeps everything locked in time.Final Preparations
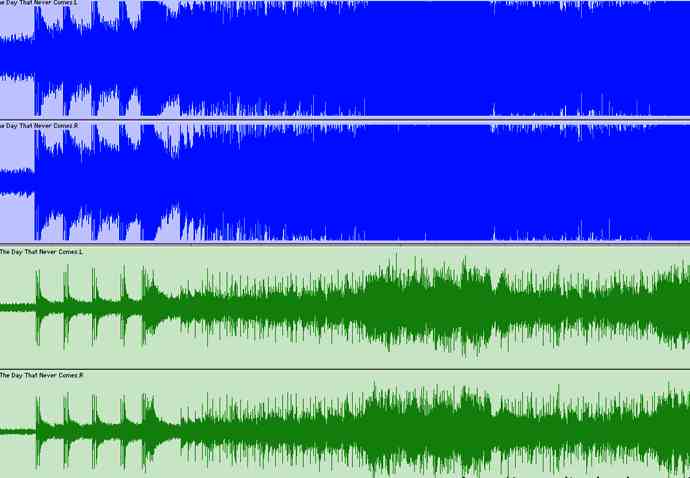
Include a count-off: You can include a 2 bar count-off at the beginning of your song. This can be in the form of a click track or just a simple "1, 2, 3, 4". When you get your drum tracks back, you can simply line up this count-off with your existing audio.

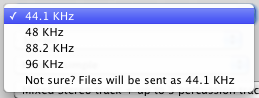
Check your sample rate and bit depth.
When your song is ready to upload, there is one more step to ensure that drum tracks come back to you in the proper sample rate and bit depth.
When you upload your song, you will be asked what sample rate and bit depth you would like your files sent as. It is best to match these settings with your existing song to ensure proper playback and sonic quality.

Refer a Friend, Leave a Comment, WIN!
When you refer a friend to MyOnlineDrummer, and they upload a song, you will earn $25 off your next order. Start earning today!
Also, leave a comment on our Facebook page

and be automatically entered to win a free drum track.

Next month stay tuned for a video tutorial.

Monday, March 29, 2010

Master Your Mastering Skills

This week we talk about mastering and what it can and can't do for your mixes. As always, you can learn more and hear some audio samples on our Podcast. If you're not subscribed to it yet, please do.


What is Mastering?

Mastering is an elusive and often misunderstood term in recording lexicon. For some, it means just making the song A.L.A.P. (As Loud As Possible), but this can completely destroy the mix you've worked so hard for. For others, mastering is a minor adjustments to final mixes that can subtly enhance the songs and make an album work as a whole. I prefer to favor the latter and get other sonic surgery done while mixing.
These minor adjustment can include equalization, compression, expansion, reverb, fades, stereo widening or narrowing, limiting, and dither.Each process has its advantages and drawbacks which can in turn help or hurt your well-crafted mix.
Mastering is not a time to rethink your mix or try to fix balance issues. That should all be done before you get to the mastering stage.

Compression in Mastering
As with any artistic or musical work, the sound is up to you, but here are a few guidelines if you want to keep the quality of your work.

Don't OVER-COMPRESS: Too much compression leaves no dynamics in a song and can ruin the sound faster than anything else. Over-compression often results in tracks that have no punch and sound very flat and boring.
Use multiple stages of compression: If you really want the compressed sound and loud sound without losing dynamics of your mix, try using compression in steps. First run your mix through a gentle compressor with the attack and release times set high, threshold set low, and the ratio low, about 1.2:1. After this, send it through another, with a bit faster attack time and slightly more ratio, perhaps 1.5:1. Repeat this process until you are satisfied with your sound. Then, you can put a limiter on it if you need to, but then again, only very gentle limiting is needed at this point because you have taken care of many of the sonic qualities you were after.
Use parallel compression: If you want to use compression, but not alter the transient peaks of the recording, this technique can work wonders. First, make a duplicate of the track you are mastering. Next apply compression to the duplicate track. Here is where you can go crazy with the compressor. The ratio can be anywhere from 3:1 to 50:1 depending on your material. This track should sound prettty flat compared to the uncompressed one. The idea is to really compress this track so when you mix it with your original mix it helps fill out the lower level material, but leaves the peaks and punch in the original track. This leads to a higher perceived loudness without squashing the sound down from the top. Instead the sound is being pushed up from the bottom and met with the top, producing a full and dynamic master.
Upload and Win!
Congratulations to Eric Marches, winner of last month's contest.
 When you order drum tracks and upload songs to your account between now and April 25,  you will be automatically entered to win a FREE drum track. You can also enter by leaving a comment below.
Next month we will talk about choral editing techniques.

Wednesday, February 24, 2010

Getting More From Your Mics

It seems that in the recording world, we often use the same mic for one certain application, over and over again, year after year. For instance, the Shure SM57 has been the standard mic for a snare drum for decades. Go to any studio anywhere in the world, and you will see these mics being used on a snare drum at some point. Of course, there is a reason that certain mics are used for certain applications; they sound really good! You can, however, teach and old mic new tricks, so to speak.
Ever tried using that SM57 for a studio vocal mic? It works for live sound, why not for studio? How about using a kick drum mic such as the AKG D112 on a bass cabinet. Ever used a cheap Radio Shack mic on a guitar? It may not be the cleanest, best sound, but it could be just what you're looking for to give your tracks a bit of dirt.
New mics can still be used the same way as the old ones. Many new mics are based on earlier designs and even attempt to model the circuitry of the vintage mics. This leads to many newer models of mics still being used in the same way as the originals were 30, 40, or even 50 or more years ago.
However, the newer mics have often been upgraded with modern circuitry and solid state transformers as opposed to tube circuitry. This allows them to be used in the same way as old mics, but with better results and less noise.
If you have the chance to use any of the truly vintage mics, not remakes, listen for the sonic quality differences compared to newer mics. Mics are built to accommodate the recording equipment of the time. Depending on what your are recording to, an old mic can sound fairly new when paired with modern equipment. Conversely, a new mic can have a retro, vintage sound when paired with  old preamps and recording equipment.
Congratulations to Mark Bennett, winner of last month's contest.
When you order drum tracks and upload songs to your account between now and March 20, you will be automatically entered to win two FREE drum tracks. You can also enter by leaving a comment below.
Next month we will talk about mastering, what it is and what it isn't.

Monday, January 25, 2010

Recording and Mixing Acoustic Guitars

This months blog and Podcast focuses on getting better guitar sounds from the start, and how to mix multiple mics. You can also enter our contest to win free drum tracks. Be sure to check out the Podcast for some cool examples.
Recording Acoustic Guitars
One of the more difficult instruments to get sounding good in the studio is the acoustic guitar. One reason is that acoustic guitar is a very tonally complex instrument. Another, is that unlike an electric guitar where the sound comes out in front of the amp, an acoustic has sound coming out of every side and angle. Most guitarists only hear their instrument from above, but conventional mic placement is always in front. This leads to many guitarists not liking how the recording sounds, but unsure exactly why.
A simple technique for a good sounding recording is to start with a single condenser mic about 12 inches in front of the guitar pointing at the edge of the hole and fretboard. Be careful of too much low-midrange as you get close to the sound hole. If you want stereo, use one mic pointing at the hole, and another pointing at the middle of the fretboard.
In addition to using mics in front of the guitar, a mic or 2 can be placed near the players head, pointing down at the guitar. Experiment with placement and always use your ears as a guide. Try recording each mic onto a separate track and then soloing each one to decide what you like or don't like about the sound.
Mixing Guitars
Now that you've got all your tracks recorded, you've got a few options. One is to mix all the mics and process the tracks gently to produce a clean, single guitar track. Another option is to process each mic completely different from the others and use effects to produce some new and wild textures.
Starting with the stereo mics in front, pan one hard left and the other hard right. If your mic placement and room are good, this usually produces a clean stereo image. However, if the recording room is not the greatest, try panning them 50-70% to each side instead of 100%.
With the over-the-shoulder mics, solo each track, and if you find a frequency that you like, boost it a bit. If there is a problem frequency, cut it a little. This way you can get the best of each mic and mix them to make the best sound.
For that 'army-of-guitars' type of sound, try using some effects such as delay, drastic EQ, and distortion on a few of the tracks. Pan some hard left and hard right. Leave at least one track dry and unaffected to give some solidity and ground to the sound. Another way to get a thick sound is to double or triple track the same guitar part. Each performance will be slightly different and provide a great cohesive sound when mixed together.Armed with these techniques, you can explore and find the perfect guitar sound for your songs.
Next month we'll talk about mastering; what it is, and what it isn't.